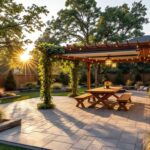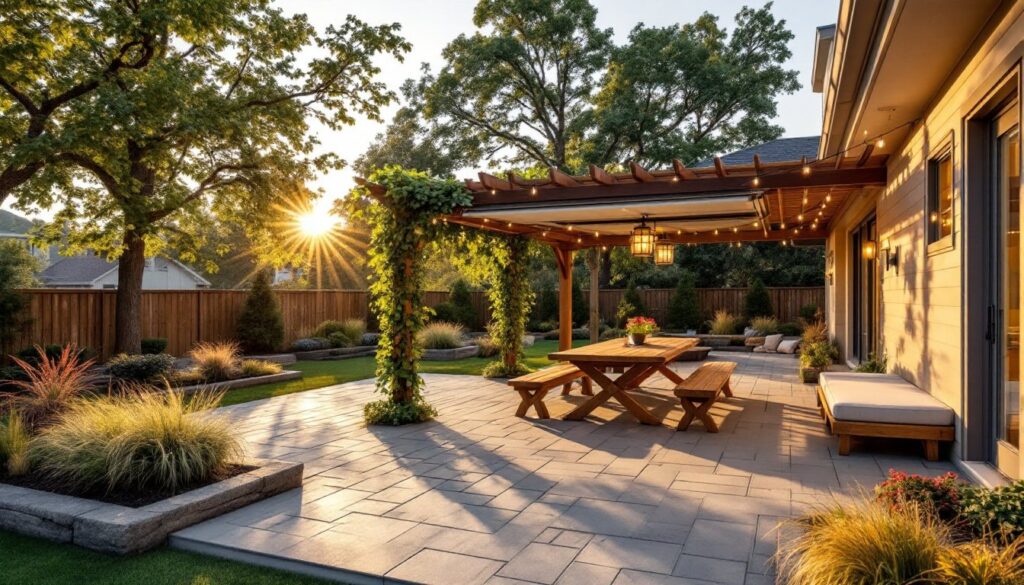

A covered outdoor kitchen transforms your backyard from a seasonal space into a year-round entertainment hub. Whether you’re grilling in the rain, prepping meals under the shade, or hosting dinner parties without worrying about sunburned guests, this investment pays dividends in both function and lifestyle. The best part? You don’t need to drop $50,000 to make it happen. From sleek modern setups to cozy farmhouse retreats, today’s covered outdoor kitchen ideas fit every aesthetic and budget. Let’s walk through seven design approaches that’ll have you thinking less about your indoor kitchen and more about those alfresco dinners.
Table of Contents
ToggleKey Takeaways
- Covered outdoor kitchen ideas transform your backyard into a year-round entertaining space without requiring a $50,000+ budget if you plan strategically and consider phased construction.
- Follow the classic work triangle layout—positioning your prep station, grill, and serving area with at least 12 feet of clearance from seating to keep guests comfortable and smoke away from gathering zones.
- Choose roofing materials that match your design style and climate: standing-seam metal lasts 30+ years, polycarbonate is budget-friendly, and wood suits rustic aesthetics but requires regular maintenance.
- Invest in weatherproof, outdoor-rated countertops such as sealed concrete ($500 for a 10-foot run), composite materials, or stone rather than interior plywood to ensure durability in all seasons.
- Start with a solid shelter structure and freestanding grill, then layer in refinements like permanent plumbing, built-in appliances, and custom storage over time to spread costs and avoid features you won’t use.
- Include proper electrical planning with dedicated 20-amp and 30-amp circuits, weatherproof storage cabinetry, a prep sink, and LED task lighting for both safety and ambiance in your covered outdoor kitchen.
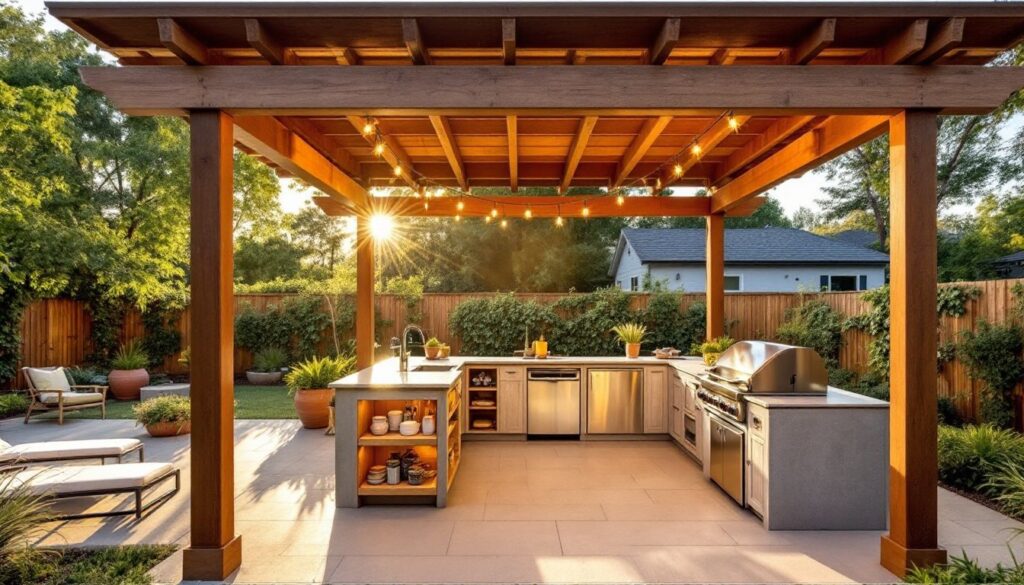
Modern Minimalist Covered Kitchen Designs
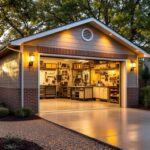
Clean lines, stainless steel, and a no-fuss attitude define modern minimalist covered kitchens. Think built-in grills, polished concrete countertops, and overhead panel structures that look more gallery than backyard. The appeal here is restraint, every element serves a purpose, and visual clutter is the enemy.
This style works best with flat or low-pitched roofs supported by simple beam work. A 6×10 foot overhead structure (or larger, depending on your counter depth) keeps the space light and airy rather than fortress-like. Pair it with sealed concrete or composite decking underneath: neither requires constant staining like wood. Appliances should be weather-rated stainless steel, look for built-in models rather than standalone equipment. A single prep sink, integrated refrigerator drawer, and one primary cooking surface keep things uncluttered.
Lighting matters here. Recessed LED strips or minimal pendant fixtures tucked under the frame edge prevent visual noise. Sightlines are crucial too, hide the propane tank on the side or underneath, and route utilities through the posts so nothing dangles visibly. Modern minimalist works particularly well in urban or suburban lots where you want the space to feel like an extension of your home’s interior, not a detached shed.
Rustic Farmhouse-Style Outdoor Kitchens Under Cover
Rustic farmhouse style invites weathered wood, cast iron, open shelving, and a lived-in charm that actually looks better as it ages. Reclaimed wood beams, tongue-and-groove ceilings, and salvaged brick or stone transform a covered structure into a gathering place that feels timeless rather than trendy.
Frame your cover with thick wooden posts (think 6×6 or 8×8 timbers) and exposed rafter tails. A metal standing-seam roof in black or dark bronze adds authentic weight without the fussy upkeep of thatch. Counters can be butcher block, weathered stone, or even concrete with a rustic finish. Open shelving built into the side posts lets you display vintage serving pieces and keeps tools within arm’s reach, no cabinet doors to wrestle open when your hands are covered in grill grease.
For appliances, a vintage-style gas grill (or reproduction model) and a wood-fired pizza oven make this style sing. The beauty of farmhouse is that it embraces patina, so perfectly matched finishes aren’t required. A simple wooden bar counter on one side and a serving station on the other create flow without overthinking it. String lights or Edison-bulb fixtures add warmth after dark. This style hides imperfections gracefully, making it forgiving for DIY builds where every corner won’t be pixel-perfect.
Mediterranean-Inspired Covered Cooking Spaces
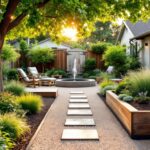
Mediterranean designs evoke a Tuscan villa or Greek island getaway, arched openings, warm terracotta and stone tones, and an abundance of plants and natural light. This style thrives under a pergola-style roof with angled cross-beams or a curved barrel-vault structure that frames views beautifully while filtering sunlight.
Materials should feel handcrafted: stacked stone walls, clay tile accents, and curved archways. Countertops in warm limestone or tumbled marble develop character over time. A wood-fired oven with a curved dome becomes the focal point, not just functional but a work of art. Pair it with herbs in rustic clay pots, a small fountain or water feature, and climbing vines on one side of the structure for dappled shade.
Color palette leans warm: burnt sienna, sage green, cream, and weathered terra cotta. A small prep sink with an arched alcove feels more like a European village than suburban backyard. Lighting comes from wall-mounted lanterns or candlelit evenings. The overhead structure can be simple wood trellis or wrought-iron framework, the vines will do much of the visual heavy lifting. This style is less about every detail being perfect and more about creating an atmosphere of leisurely meals and good company, which any homeowner can achieve.
Smart Layout And Functionality Tips
Regardless of style, a well-designed covered kitchen layout follows the classic work triangle: prep station, cooking zone, and serving/storage area. Position your grill where smoke and heat drift away from the seating area and house, prevailing wind direction matters. Allow at least 12 feet of depth from the grill to your dining/lounge zone to keep guests comfortable.
Counter depth should be 24–30 inches (standard kitchen depth) so you’re not reaching across a mile of surface. A 6-foot minimum counter run on one side of the grill gives you space for prep and cooling-off platters. If space is tight, an L-shaped layout with the grill at the corner works efficiently. Include a prep sink positioned near the grill for rinsing vegetables and utensils: running plumbing is worth the effort because hauling water kills workflow.
Storage is where most DIY builds falter. Plan weatherproof cabinetry or sealed shelving for tools, fuel, and serving dishes. A dedicated mini-fridge or beverage cooler (18–24 inches wide fits most layouts) keeps drinks on-site and reduces indoor kitchen traffic. Lighting is safety and mood: install overhead LED strips along the counter and add task lighting above the grill so you can see food without shadows. Don’t skimp on electrical: a dedicated 20-amp circuit for small appliances and a separate 30-amp line for a built-in electric grill prevents tripping breakers mid-party.
Choosing The Right Roofing And Materials
Your roof choice affects both durability and aesthetic. Polycarbonate panels are budget-friendly, let light through, and are lightweight, but they can yellow and limit your design options. Standing-seam metal roofing (0.55mm steel or aluminum) is durable, clean-looking, and works across styles: expect to spend more but gain 30+ years of service. Wood shingles or shakes suit rustic or Mediterranean themes but require regular maintenance and attract insects in wet climates, plan on re-staining every 3–5 years.
For structural support, pressure-treated lumber or cedar posts are standard: treat all wood with a water-repellent sealant on year one and refresh every 2 years. 4×4 posts handle most residential shade structures up to 12 feet: verify local snow and wind loads before sizing. Your local building department may require engineered drawings for any roofed structure over 200 square feet, and some jurisdictions mandate a footprint permit regardless of size. Don’t skip this, unpermitted work creates headaches at resale.
Countertop materials must be outdoor-rated. Sealed concrete is affordable and tough but can crack in freeze-thaw cycles in northern climates, add a sealant annually. Composite materials (Corian, Quartz) resist staining and require minimal upkeep but cost more. Stone (granite, limestone, slate) is durable and handsome but needs sealing and can be slippery when wet. Avoid standard interior plywood or MDF: use marine-grade plywood if building any cabinets, and always prime and paint exposed wood thoroughly.
Budget-Friendly Covered Kitchen Solutions
You don’t need $30,000 to build a functional covered outdoor kitchen. Start with a simple pergola frame (4×8 or 6×10 feet) over a concrete pad, total material cost for posts, beams, and roofing can land under $2,000 if you source lumber locally and do the assembly yourself. Pair it with a quality freestanding gas grill ($800–$1,500) rather than built-in models, which add installation complexity.
Counters can be as simple as a pressure-treated 2×12 board on concrete blocks, sealed and painted, or a DIY concrete countertop poured in place (materials only, around $500 for a 10-foot run). A basic utility sink on a frame with hose hookup beats no sink at all. For storage, open shelving from 2×4s and plywood costs far less than custom cabinetry: weatherproofing with outdoor paint is the key maintenance step.
Layer your investment: start with the shelter and primary cooking surface, then add refinements over time. A covered outdoor kitchen built in phases, basic structure one year, built-in appliances the next, permanent plumbing down the road, spreads costs and lets you learn what you actually use before splurging on premium features. According to recent backyard makeover guides, phased projects often end up more personalized and less likely to include features you’ll regret. The frame and roof are the anchors: everything else can evolve. With honest DIY effort, a solid three-season covered cooking space is achievable for $3,000–$6,000 depending on your region and material choices.
Conclusion
A covered outdoor kitchen isn’t a luxury, it’s a practical, lifestyle-enhancing project that extends your home’s living space. Whether you choose sleek minimalist lines, rustic charm, or Mediterranean warmth, the foundation is the same: solid structure, smart layout, and honest assessment of what you’ll actually use. Start with the shelter and grill, dial in your workflow, and build from there. Your future self, grilling in the rain while guests linger under the eaves, will thank you for the investment.