
A backyard doesn’t need a contractor’s budget to look polished and inviting. Smart planning, upcycled materials, and strategic plant choices turn even modest yards into outdoor living spaces worth spending time in. This guide walks through practical backyard landscape ideas on a budget, from gravel pathways to repurposed focal points, so homeowners can tackle projects themselves without emptying their wallets. Whether you’re starting from scratch or refreshing what’s already there, these strategies deliver real visual impact without the premium price tag.
Table of Contents
ToggleKey Takeaways
- Plan your backyard landscape ideas on a budget by observing sun exposure, drainage, and foot traffic before breaking ground to avoid expensive reworking later.
- Gravel pathways and mulch are the most cost-effective hardscaping solutions, running just $30–50 for a 20-foot path when installed over landscape fabric.
- Native plants and perennials deliver long-term savings by requiring less water, fertilizer, and maintenance than non-native annuals, paying for themselves within two years.
- Repurposed materials like reclaimed wood pallets, stone scraps, and salvaged bricks create memorable focal points that add character without premium price tags.
- Budget-friendly water features and solar lighting transform your yard’s ambiance for $50–150 combined, requiring no expensive wiring or professional installation.
Plan Your Layout Before You Dig
The biggest money-waster in DIY landscaping is reworking a space because the initial layout didn’t account for sun exposure, drainage, or foot traffic patterns. Spend an afternoon observing your yard before breaking ground.
Note where shade falls at different times of day, where water pools after rain, and how people naturally move through the space. Sketch your layout on graph paper or use a free online tool, nothing fancy required. This planning phase costs nothing but saves hundreds in replanted shrubs and rerouted pathways.
Measure twice, mark once. Use spray paint or stakes to outline planting beds and hardscape areas. At this stage, it’s easy to adjust a line: once you’re digging, changes get expensive. A free landscape design tool or app can help visualize plant placement and material quantities before purchasing anything. Think about focal points: a seating area, a garden bed, a small water feature. Budget landscaping works best when it’s intentional rather than scattered.
Consider your yard’s functional needs, too. Do you need a play area for kids? A dog run? A spot for grilling? These decisions shape where hardscape goes and which plants work best. A functional yard that looks lived-in beats a pristine, unusable one every time.
DIY Hardscaping Solutions That Save Money
Hardscape, pathways, edging, and ground surfaces, defines a landscape and costs a fraction of what landscape contractors charge. The key is choosing materials that suit your yard’s style and your skill level.
Gravel and mulch are the budget hero. Both are cheap, easy to install, and effective. Gravel works for pathways and casual planting bed borders: mulch (shredded bark or wood chips) retains soil moisture and suppresses weeds. Calculate square footage, add 10% for settling, and order bulk delivery to save on per-unit costs. Spread it 2–3 inches deep for proper coverage.
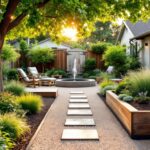
Gravel Pathways And Ground Covers
Gravel pathways are forgiving and cheap to install. Lay landscape fabric first to prevent weeds from pushing through. Overlap fabric edges by 6 inches and stake or pin them down. Pour gravel over the fabric, pea gravel looks nicer than crushed rock for paths, and rake it level. A 4-foot-wide path typically runs $30–50 in material for 20 feet.
Alternatives to consider: mulch pathways (warmer underfoot, better in shade), recycled asphalt (compressed, stable, very cheap), or stepping stones set in mulch (more formal look). Each has trade-offs. Mulch compacts and needs refreshing every 2–3 years: recycled asphalt is dusty in dry weather: stepping stones require careful spacing but last longer.
Edging keeps gravel and mulch contained. Metal edging (landscape steel) is professional-looking and costs about $1–2 per foot. Plastic edging is cheaper ($0.50–1 per foot) but less durable. For a tight budget, use reclaimed wood or salvaged brick as edging, free or near-free if sourced locally. Secure edging 2–3 inches deep so it holds back loose material.
Don’t skimp on prep work. Remove grass and existing vegetation first, a shovel and sweat do the job, or rent a sod cutter for $50–75 per day if the area is large. Rake the base level and compact it lightly. A smooth, clean base prevents settling and keeps hardscape stable for years.
Smart Plant Selection And Placement
Plants are living hardscape, and choosing the right ones saves money on maintenance and replacement. Wrong plants in the wrong spot die within a season, wasted cash and frustration.
Start by understanding your yard’s conditions: full sun (6+ hours direct light), partial shade (3–6 hours), or full shade. Check your USDA hardiness zone and soil type (sand, clay, loam). These three facts narrow your plant list to species that thrive without coddling. A native plant guide for your region shows which species attract pollinators, need minimal water once established, and survive local pests and diseases.
Native Plants And Perennials For Long-Term Savings
Native plants are the budget landscaper’s best friend. They’ve adapted to your climate, so they need less water, fertilizer, and pest management than non-natives. They’re often cheaper, too, especially from local nurseries or native plant societies. A native shrub costs the same as a fancy hybrid but outlives it by years with less fussing.
Perennials return year after year without replanting. A perennial bed costs more upfront than annuals, but the math flips fast. Five perennials ($15 each) cost $75. Five annuals every season cost $75 per year. After year two, perennials are a bargain. Plant perennials in groups of 3 or 5 for visual impact, singles look sparse.
Start small and let plants mature. A newly planted bed looks bare: resist the urge to crowd it. Follow spacing recommendations (usually on plant tags). Tight spacing leads to disease, crowding, and pruning headaches. A sparse bed for year one becomes lush by year three as plants fill in. Patience saves money and frustration.
Grouping plants by water need (drought-tolerant together, moisture-lovers together) simplifies watering. Establish plants with deep watering for the first month, then taper off. Mature native plants thrive on natural rainfall in most regions. Mulch around plants suppresses weeds, retains moisture, and looks finished, this single step cuts maintenance by half.
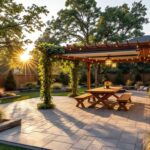
Create Focal Points With Upcycled And Repurposed Materials
A focal point gives a yard purpose and draws the eye. A specimen plant, a seating area, or a water feature creates visual structure. Budget landscaping leans on repurposed materials to build them without very costly.
Reclaimed wood is everywhere, old pallets, fence boards, fallen trees, salvage yards. Pallets become raised beds, seating, or privacy screens with a little reinforcement. A pallet bed requires 2×6 boards as edging, landscaping fabric as a liner, and soil. Cost: $20–40 for a 4×8 bed. Reclaimed wood raised beds look rustic and charming, suit modern and cottage gardens, and warm up a hard landscape.
Stone and brick scraps create focal points. A small cairn (stacked stone sculpture) costs nothing if sourced from your own yard or a construction site. A broken terracotta pot becomes a planter. Old bricks lay out a seating nook or frame a planting bed. These repurposed materials add character and story to a landscape in ways new, uniform materials can’t match.
Wood stumps become planters, stepping stones, or seats. Drill drainage holes in stumps, fill with soil, and plant shallow-rooted annuals or groundcovers. Paint a stump to match your palette, or leave it natural. A collection of stumps in various heights creates visual interest and a play area for kids.
Search “free materials” on local buy/sell sites, you’ll find fence panels, decorative stone, old gates, and outdoor furniture given away. A coat of exterior paint transforms most finds. An old wooden gate leaning against a fence becomes an instant trellis for climbing vines. Bent fencing becomes a plant support or temporary bed edging.
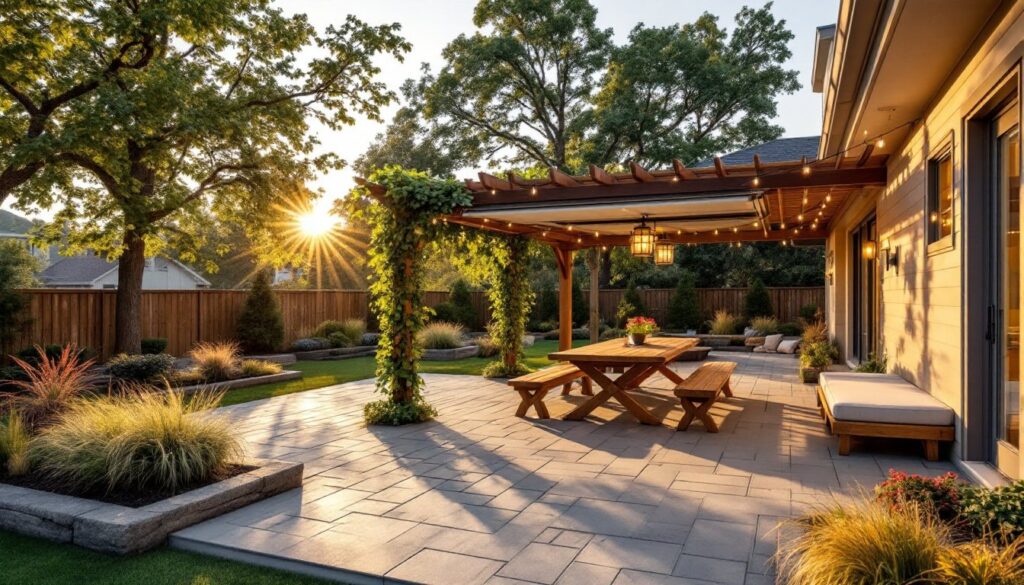
Low-Cost Water Features And Lighting
Water and light transform a backyard without expensive installation. A small fountain or pond creates focal points and soothing ambiance.
A simple water feature costs $50–150. Buy a preformed shallow basin, place it in the ground, add a small submersible pump (15–20 watts, $30–50), and run a hose from the pump to a birdbath or stone sculpture set above the basin. Water recirculates, creating a gentle flow. Refill monthly (evaporation happens) and keep the pump intake submerged. It’s not a koi pond, it’s a budget-friendly focal point that attracts birds and adds movement.
Alternatively, fill a large terracotta urn or wooden trough with water. Add aquatic plants like water iris or pickerel rush ($10–20 each). No pump needed. Drain and refill every month or two. This approach works in any yard and costs $40–100 total.
Solar pathway lights are cheap and need no wiring. A 10-pack runs $20–30. Plant them along your gravel path or seating area. They charge during the day and glow at night, perfect for safety and ambiance. Replace the rechargeable batteries every 1–2 years ($2 each) and they’ll run indefinitely.
For more impact, string lights between posts or trees. Café lights (bistro-style Edison bulbs) cost $30–80 for 10–20 feet and create instant warmth. Solar strings work, too, though they’re dimmer. Hang lights low (7–8 feet) over a seating area for intimate scale.
Lighting highlights focal points. Train a solar spotlight on your specimen tree or repurposed sculpture. Uplighting (light from below) creates drama: downlighting (light from above) feels natural. Layer light sources, pathways, a focal point, and overhead strings, instead of one bright spotlight, which flattens a space.
Safety matters: keep lights away from tripping hazards, use outdoor-rated fixtures and bulbs, and ground any wiring per local code. Solar options skip wiring headaches entirely.